
 EN
 English
 繁体中文
 Italian
 Greek
 Spanish
 Hebrew
 Japanese
 Portuguese
 Korean
 Russian
 French
 German
 Arabic
Blog & Events
Follow NOVANEON for more valuable information to know early
Follow NOVANEON for more valuable information to know early
Nov 10Source: Views: 14
Effective drainage for in-ground lighting combines four elements into one system: site grading that moves water away, a permeable substrate beneath the fixture, a drainage channel or weep holes, and waterproof fixtures. Hipolighting notes that a gravel layer helps only where surrounding soil absorbs water and a discharge path exists. Standing water, soil moisture, freeze-thaw cycles, and corrosion shorten the life of any in-ground fixture.
Poor drainage traps pooled rainwater around the housing, and a sealed recess turns the fixture into a water pocket. This article moves through each component in order, from site assessment to routine maintenance, so readers can apply the guidance to their next installation. Good Drainage Design starts before the concrete is poured.
Drainage design begins with the ground itself. Soil absorbs water at different rates, and that rate decides how much water the ground can take before it saturates. Sandy soils drain quickly, while clay soils hold water for long periods. A designer tests or observes the soil on site and records how fast a dug hole clears after rainfall. Slow clearing signals a site that needs extra help.
The water table marks the level where soil stays permanently wet. A high water table keeps the base of an in-ground fixture submerged even in dry weather. Designers measure this level during the wet season, not the dry one. A fixture set below the water table needs a raised base or a positive discharge path. These two factors together tell the team whether the ground can handle water on its own.
Slope, or grading, gives water a direction to travel. A flat site lets water pool around the housing. A gentle fall moves water toward a drain, a planting bed, or a lower grade. The team maps this path before the installation begins and confirms that water leaves the fixture zone rather than collecting there.
Proper site drainage also depends on a clear outlet. Water needs somewhere to go once it leaves the fixture. A defined path ends at a storm drain, a French drain, or a graded swale. Designers check that the path stays open after landscaping and paving. They also confirm that the outlet sits lower than the fixture base. This step protects in-ground fixtures from backflow during heavy rain. A site with good absorption and a clear outlet supports simpler drainage details. A site with poor absorption and a high water table needs a more deliberate approach.
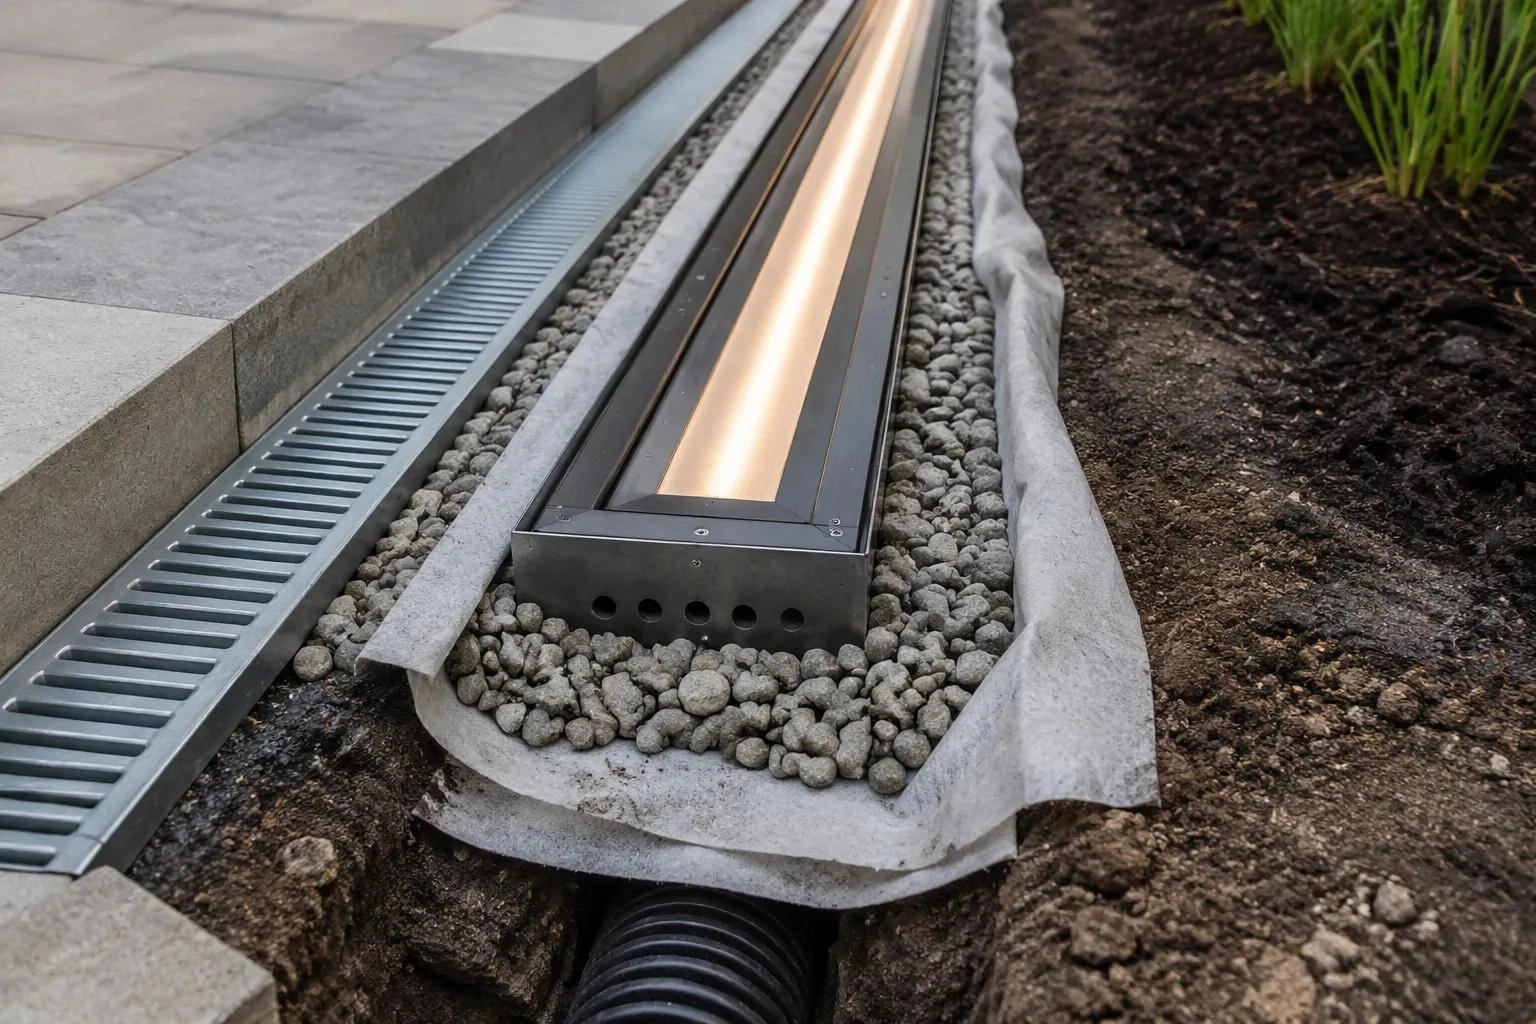
Channels and weep holes both move water away from a fixture, and each fits a different set of site conditions. A drainage channel is a continuous open path, usually a formed trench or a manufactured grate, that carries water along the length of a linear fixture run. It suits long runs where water collects along the whole housing and where the outlet sits at one end. A weep hole is a small opening at the low point of a housing or recess. It lets trapped water escape before it rises above the seal line. Weep holes fit compact recesses and short runs where a full channel would add unnecessary excavation.
Feature | Drainage Channel | Weep Hole |
Best fit | Long linear runs, continuous collection | Short runs, compact recesses, low points |
Water path | Along the fixture to a single outlet | Straight down and out of the housing |
Maintenance | Requires clearing along its length | Requires clearing at each opening |
Neither option replaces the other in every case. A designer selects the path that matches the run length, the outlet location, and the available fall. Many projects combine both: a channel handles bulk flow, and weep holes drain the residual moisture that collects at the base.
A gravel or crushed-stone layer assists drainage only when two conditions hold. First, the surrounding ground must absorb water at a workable rate. Second, an appropriate discharge path must exist away from the fixture. When both conditions are present, the stone acts as a drainage layer that holds water briefly and releases it into the soil. The voids between stones store water and slow its movement, which reduces the head pressure on the housing.
Permeable backfill works the same way. Washed stone with open voids passes water more freely than compacted native soil. Designers wrap the stone in a geotextile to keep fines from clogging the voids over time. This step protects the drainage foundation for the life of the installation.
A gravel layer cannot fix a site with poor absorption or no outlet. Stone in a clay pocket simply becomes a bathtub. The layer also fails when fines wash in and seal the voids. Designers therefore pair the stone with a defined outlet and inspect it during commissioning.
For in-ground lighting, the substrate decision follows the site assessment. Sandy ground with a clear fall supports a simple stone layer. Dense soil with a high water table needs a channel or a raised base instead. The same logic applies to any inground linear fixture, whether the run is short or long. A sound substrate keeps water moving and protects the led in-ground lighting from prolonged contact with standing water. The installation crew should confirm the stone grade and the outlet before backfilling, because correcting these details later means reopening the trench.
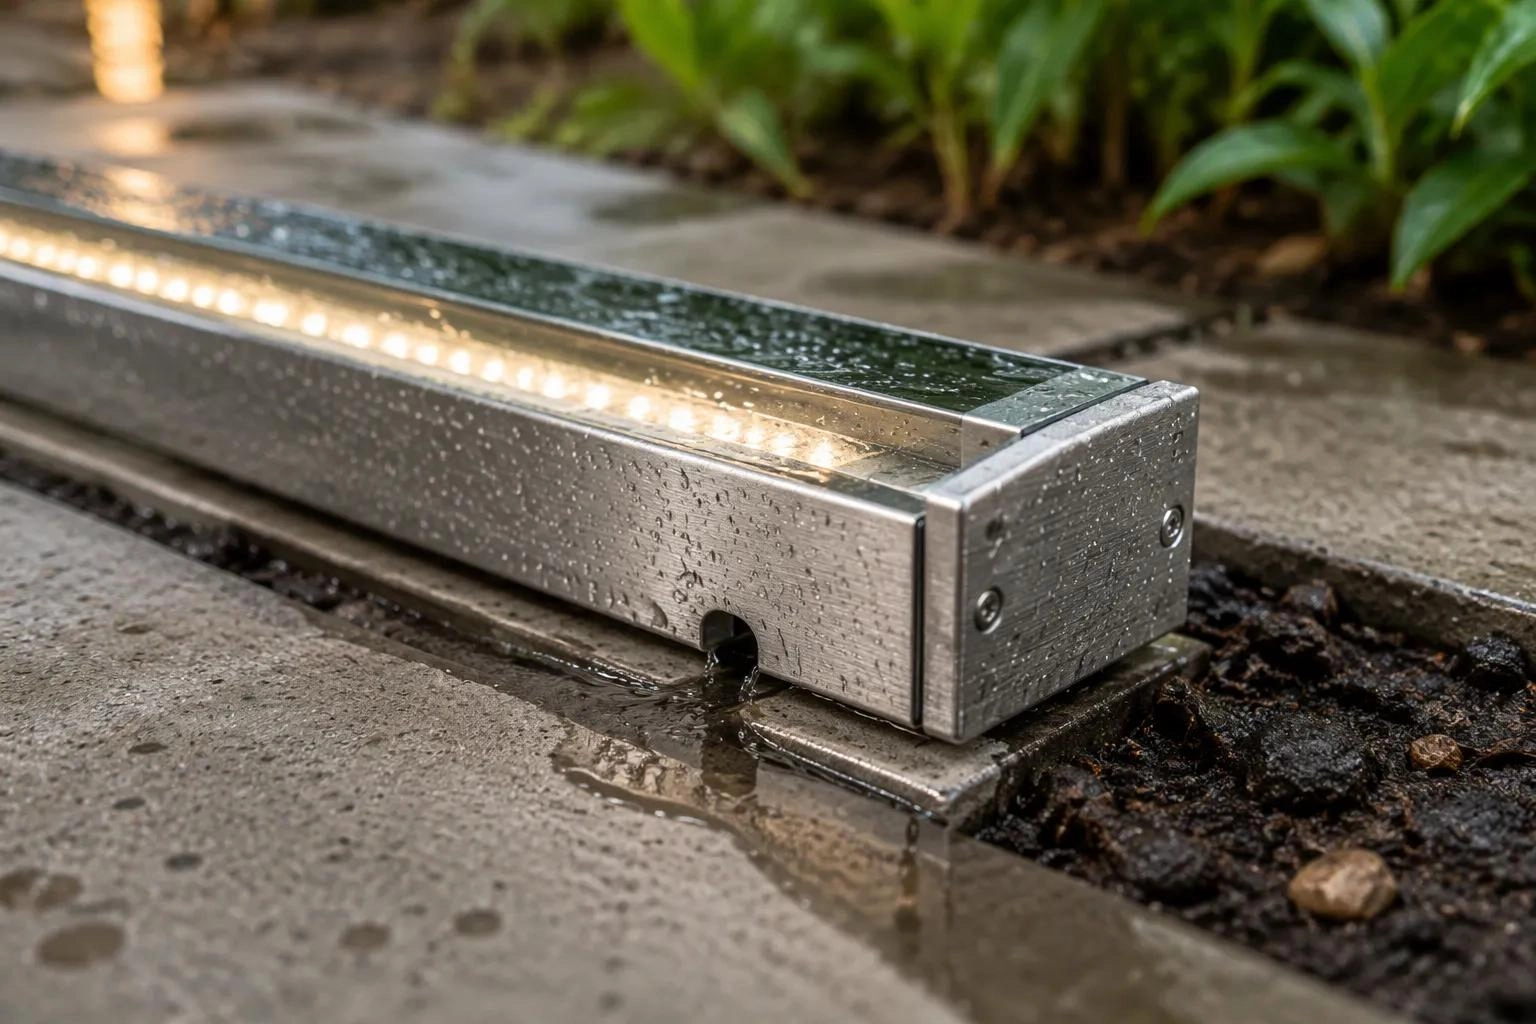
Recessed exterior linear fixtures need weatherproof housings with drainage weeps to prevent water accumulation, as PacLights notes in its exterior linear lighting guide. Housing choice and seal design work together with the drainage layer below. Waterproofing starts at the specification stage, not at the caulk gun.
The IP rating states how well a housing resists dust and water. RCLite groups the grades by in-ground suitability. IP65 resists water jets but not submersion, so it falls short for a fixture set into soil. IP67 survives temporary submersion up to one meter and serves as the safe baseline for most in-ground lights. IP68 handles continuous submersion and suits spots that flood or stay wet for long periods. RCLite advises treating IP67 as the floor and IP68 as the safe choice. Sunco adds that IP67 covers up to one meter of water for up to 30 minutes, while IP68 covers prolonged submersion at depths the manufacturer specifies. For outdoor in-ground lights, the housing material matters as much as the rating.
Material | Corrosion Resistance | Cost Index | Best Environment |
304 Stainless Steel | Good — inland, standard soil | 1.0× (baseline) | Gardens, plazas, driveways (inland) |
316 Stainless Steel | Excellent — coastal, chloride soil | 1.4× | Coastal projects, pool decks, fountains |
Brass | Very Good — develops patina | 1.8× | Heritage sites, warm-tone designs |
Die-cast Aluminum | Moderate — needs coating | 0.7× | Internal heatsink use only |
GQLamp reports that die-cast aluminum will not tolerate immersion in soil for long, with pitting appearing within a few years even when powder coated. A 304 stainless steel outer housing with a die-cast aluminum inner heatsink gives corrosion resistance outside and efficient heatsinking inside. GQLamp rates these fixtures at 50,000 hours to the L70 point, confirmed by IES LM-80 chip data, or roughly 11.4 years at 12 hours daily. Coastal sites call for 316 stainless, which resists chloride soil far better.
Structural sealant around all penetrations, with backing rods, helps prevent water intrusion. US Made Supply recommends a two-to-one width-to-depth ratio, so a half-inch joint takes a quarter-inch of sealant. A closed-cell backer rod about 25 percent wider than the joint gives a compressed fit and stops three-sided adhesion, the most common cause of sealant failure. One-part moisture-cure polyurethane sealant conforming to ASTM C920 suits concrete expansion joints. The crew applies sealant between 40°F and 100°F on a dry surface and protects it from rain for 24 hours. These details matter for in-ground wall washers and any recessed in-ground luminaires exposed to moisture, soil contact, and pedestrian traffic. A sound seal keeps water ingress out of the housing and protects the led underground light inside.
In-ground lighting sits in a wet location by definition. OSHA's electrical standard for workplaces, 29 CFR 1910.399, defines wet locations to include installations underground or in concrete slabs in direct contact with the earth. The same standard, 29 CFR 1910.305, requires fixtures in wet locations to be identified for the purpose and built so water cannot enter or accumulate in wireways, lampholders, or other electrical parts. Designers should confirm that every fixture carries a wet-location listing and marking before it reaches the site.
A safety listing and an IP rating answer different questions. Rock Lighting notes that UL 1598 specifies three wet-location tests — rain, sprinkler, and immersion — and a given luminaire may face one or more of them. UL's marking guide adds that recessed fixtures at or below ground level should carry the "SUITABLE FOR GROUND-MOUNTED RECESSED" marking, which covers infrequent immersion from heavy precipitation. LED Lighting Supply points out that an IP rating alone does not establish wet-location suitability, so the team verifies the nameplate, the specification sheet, and the manufacturer documentation separately. PacLights reminds engineers that wet-location fixtures must follow NEC guidelines, including proper grounding, GFCI protection, and wiring methods rated for wet environments. A qualified electrical professional should complete the wiring and confirm sealing, mounting orientation, and environmental protection before energizing anything.
Drive-over in-ground recessed linear LED lights demand early coordination. The team should review installation details, drainage conditions, and concrete coordination against the project drawings before specifying the fixture. Load ratings, beam distribution, output, setback, aiming, drainage, environmental exposure, surface temperature, and load requirements all belong in that review. A fixture rated for pedestrian traffic will not survive vehicle loads, and the concrete surround must match the housing depth and the drainage path.
Drawings should also show irrigation, drainage, maintenance access, and the routing of drainage, wiring connections, installation method around the run. For below-grade installation, the layout must keep linear runs clear of irrigation lines and leave room to reach weep holes and channels. The team confirms wet-location and below-grade conditions with the authority having jurisdiction, then locks the details into the drawing set. This step ties drainage, and mounting components together before concrete is poured, which protects the led in-ground lighting and every inground fixture on the project.
Spending should follow risk. A pedestrian garden path with sandy soil and a clear fall needs only a modest gravel layer and a few weep holes. A coastal plaza with clay soil, a high water table, and vehicle traffic carries far more risk, so the budget should shift toward a channel, a raised base, and 316 stainless housings. Designers rank each run by exposure and consequence of failure, then direct money to the runs that face the most water.
Relative cost tiers help the conversation. A gravel layer with weep holes sits at the low tier. A formed channel with a grate sits in the middle. A raised base with a positive discharge path and premium housing material sits at the high tier. The high tier earns its place on sites that flood or stay wet, and the low tier serves stable, well-drained ground. Matching the tier to the site avoids both overspending and callbacks.
Each option fits a distinct set of conditions, and no single choice wins everywhere. The table below pairs common site conditions with the drainage approach that suits them best.
Site Condition | Suitable Approach |
Sandy soil, gentle fall, clear outlet | Gravel layer with weep holes |
Long linear run, single low outlet | Formed channel with grate |
Clay soil or high water table | Raised base with positive discharge |
Coastal or chloride soil | 316 stainless housing plus channel |
Compact recess, short run | Weep holes at the low point |
A designer reads the site first, then selects the option. Gravel and weep holes keep costs low on forgiving ground. Channels and raised bases cost more upfront and protect in-ground fixtures on difficult sites. This logic applies to in-ground wall washers, linear runs, and every inground fixture on the drawing set. Sound drainage design at the planning stage also lowers the long-term cost of the installation, because crews avoid reopening trenches and replacing failed led in-ground lighting. Treat in-ground lighting budgets as a whole system, and the drainage line item pays for itself through fewer service calls.
Steady light output over many years depends on a dry housing. Tru-Scapes reports that standing water is the leading cause of early failure in in-ground well lights, and most failures trace back to trapped water, poor drainage below the housing, or unsealed splices rather than the LED itself. A simple inspection schedule protects the investment.
Crews should check weep holes, channels, and sealant on a set calendar. Clear each weep hole at the low point and confirm that water escapes freely. Sweep leaves and sediment from channel grates so flow stays open. Press a finger along the sealant bead and look for cracks, gaps, or lifted edges. Reapply sealant where the bond has failed. A short checklist keeps the led in-ground lighting stable through every season.
Freeze-thaw cycles test every weak point in the system. Asphalt Inc explains that daytime warmth melts ice, water seeps into small cracks, and nighttime freezing expands that water and widens the damage. Central Pro Services warns that minor defects in channels and concrete can grow into collapsed sections by spring. Preventative work before freezing temperatures arrive pays off.
Central Pro Services recommends cleaning drains, removing leaves and organic debris, clearing sediment from basins and inlets, inspecting channels for cracks, and verifying outlet conditions. Lingo Group adds a pre-winter check of outdoor connections for moisture and a grading adjustment so water does not pool and turn into ice. After dark, crews should inspect the run with frost on the ground, because angles and shadows behave differently in cold conditions. This routine keeps the in-ground lighting reliable and extends the life of each inground fixture. Good drainage and steady care protect the whole installation.
Grading, a permeable substrate, a channel or weep holes, and waterproof fixtures work as one system. Together they keep water out of the housing and prevent early failure.
1. Assess soil, slope, and water table.
2. Design drainage paths that carry water away.
3. Plan the installation around waterproof fixtures rated for the location.
4. Verify wet-location compliance against the project drawings.
5. Budget by risk, matching each option to its site.
6. Maintain weep holes, channels, and sealant on schedule.
Drainage design belongs in the lighting plan from day one. Teams that treat it as an afterthought pay later through failed led in-ground lighting and repeated service calls. Sound in-ground lighting starts with water that never settles.
Please provide the following detailed information so that our business representatives can better understand your needs and get in touch with you as soon as possible.